Showing posts with label Ubuntu. Show all posts

Wednesday, May 13, 2009

Free Linux Ebooks Collection For Newbie

I'm listing here a free book collection and sure it will very useful among Linux users and rightfully so, who doesn’t like free books? No matter how experienced you are with Linux systems, there is always something new you can learn from a good book that focuses on specific aspects of a Linux system. I tried to make a list of free books by categories. “Beginners”, “Advanced” and “Administrators”.

Here I have listed e-Books for "Linux Ebooks For Newbie", "Intermediate and Advanced Linux Users" and "Linux System Administrators".

Here's listed a comprehensive list of Free Linux related e-books. I didn't arrange the ebooks in proper categories.

E-books:

  1. Linux Client Migration Cookbook, Version 2: A Practical Planning and Implementation Guide for Migrating to Desktop Linux by Chris Almond
  2. Linux Compute Clusters by Chander Kant
  3. Linux Device Drivers by Alessandro Rubini and Jonathan Corbet
  4. Linux Installation and Getting Started by Matt Welsh
  5. Linux Kernel Module Programming Guide by Ori Pomerantz
  6. Linux Network Administrator’s Guide by Olaf Kirch and Terry Dawson
  7. Securing and Optimizing Linux by Gerhard Mourani
  8. Self-Service Linux: Mastering the Art of Problem Determination by Dan Behman and Mark Wilding
  9. Slackware Linux Essentials by Alan Hicks, Chris Lumens, David Cantrell, and Logan Johnson
  10. The Linux Cookbook: Tips and Techniques for Everyday Use by Michael Stutz
  11. Advanced Linux Programming by CodeSourcery LLC
  12. Comprehensive Linux Textbook by Muayyad Saleh Al-Sadi
  13. Java Application Development on Linux by Carl Albing and Michael Schwarz (PDF)
  14. Linux Admins Security Guide
  15. Linux Security Howto
  16. Linux Firewall Configuration, Packet Filtering & netfilter/iptables
  17. Linux Device Drivers, Third Edition
  18. GNU Bash Reference Manual
  19. Knowing Knoppix
  20. Linux Client Migration Cookbook
  21. Vi iMproved (VIM)
  22. Linux: Rute User’s Tutorial and Exposition
  23. The Book of Webmin
  24. Linux From Scratch
  25. GNU Emacs manual
  26. Writing GNOME Applications
  27. KDE 2.0 Development
  28. GTK+/Gnome Application Development
  29. GNU Autoconf, Automake and Libtool
  30. Advanced Linux Programming
  31. Secure Programming for Linux and Unix
  32. The Art of Unix Programming
  33. The Linux Development Platform
  34. C++ GUI Programming With Qt 3
  35. Unofficial Ubuntu Guide
  36. The Easiest Linux Guide You’ll Ever Read - An Introduction to Linux for Windows users
  37. SUSE Linux Administration Guide
  38. Red Hat Enterprise Linux Installation Guide
  39. Red Hat Enterprise Linux Reference Guide
  40. Red Hat Enterprise Linux Step By Step Guide
  41. Fedora Linux EssentialsVisual Basic Essentials
  42. Fedora Core 7 Desktop Guide
  43. LDAP Operations HOWTOLearning Debian GNU/Linux
  44. Learning the Unix Operating System
  45. Linux Administration Made Easy
  46. Linux Dictionary
  47. The Linux kernel
  48. Linux Kernel 2.4 Internals
  49. The Linux Kernel Module Programming Guide
  50. LINUX: Rute User’s Tutorial and Exposition
  51. Maximum RPM, Taking the Red Hat Package Manager to the Limit
  52. Pocket Linux Guide
  53. Secure Programming for Linux and Unix HOWTO
  54. Linux+ Study Guide
  55. Ubuntu Linux Essentials
  56. PHP Essentials
  57. Javascript Essentials
  58. Red Hat Fedora Core 7 Installation Guide
  59. The Art of Unix Programming
  60. Bash Guide for Beginners
  61. Beyond Linux from Scratch
  62. The Book of Webmin Or: How I Learned to Stop Worrying and Love UNIX
  63. Brian and Tom’s Linux Book
  64. Debian GNU/Linux Desktop Survival Guide
  65. Debian GNU/Linux System Administrator’s Manual
  66. Everyday Linux
  67. FreeBSD HandbookGNU Manuals OnlineIn The Beginning Was The Command Line
  68. Introduction to Linux - A Hands on Guide

Free Linux Ebooks For Newbie:


1. Ubuntu Pocket Guide and Reference

Author: Keir Thomas
Format: PDF


2. Linux Newbie Administrator Guide

Author: Peter and Stan Klimas
Format: HTML


3. Introduction to Linux - A Hands on Guide

Author: Machtelt Garrels
Format: HTML


4. Bash Guide for Beginners

Author: Machtelt Garrels
Format: HTML


5. Rute User’s Tutorial and Exposition

Author: Paul Sheer
Format: HTML


6. The Linux Starter Pack

Author: Paul Hudson
Format: PDF


7. FLOSS Manuals

Author: FSF
Format: HTML & PDF


8. The Easiest Linux Guide You’ll Ever Read

Author: Scott Morris
Format: PDF


9. Linux Knowledge Base and Tutorial

Author: James Mohr
Format: PDF


10. Slackware Linux Basics

Author: Daniƫl de Kok
Format: HTML


Sunday, May 10, 2009

How to make OpenOffice load faster


Here we will discuss the procedure to be followed for making OpenOffice run faster in Ubuntu.

Some simple steps make OpenOffice snappier.

  • Go to Applications > Office > OpenOffice.org Word Processor


  • The OpenOffice.org Word Processor is launched. Go to the Tools menu and select Options.

  • The Options window is opened.

  • Highlight Memory on the left panel, change the setting as shown below.


    • Reduce the number of Undo steps to a figure lower than 100. Adelstein suggests 20 or 30 steps.

    • Under Graphics cache, set Use for OpenOffice.org to 128 MB (up from the original 6MB).

    • Set Memory per object to 20MB (up from the default .5MB).

    • Set the number of objects under Cache for inserted objects at 20.

    • Check OpenOffice.org Quickstarter.

  • Now highlight Java on the left panel, uncheck Use a Java runtime environment

  • Click the OK button and close OpenOffice.org. Start it up again to experience the change in speed!

Install Ubuntu on your USB Drive


Did you know that is ridiculously simple to install Ubuntu onto an external USB flash drive?

If you have a copy of the latest version of Ubuntu (at the time of writing that is 8.10), there is a very simple program that does it all for you.

You will need:

  • An Ubuntu 8.10 CD (or ISO image if already installed)
  • A USB drive with at least 700-800 MB free space

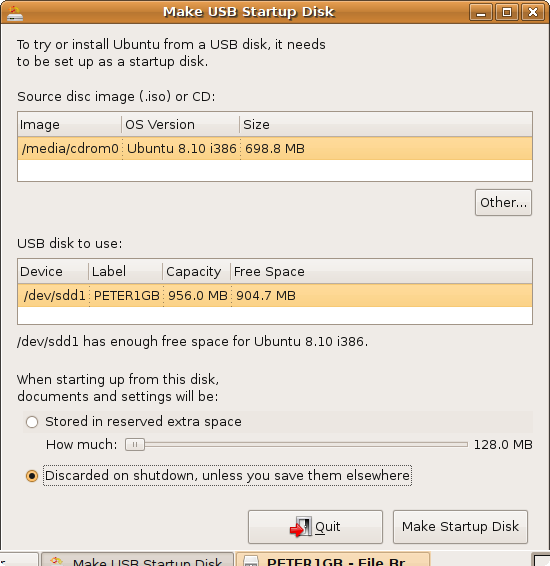
While you are booted into Ubuntu, go to System > Administration > Create a USB startup disk.

Make Bootable Ubuntu USB Drive

You'll need to choose the source disc image for Ubuntu. If you have your Ubuntu CD in the drive, this should appear in the list, so make sure it is selected. Alternatively, you can click 'Other' and specify where the .iso image of the Ubuntu CD is.

Next, plug in your drive and choose it as your destination drive (and double-check it's the right drive before going ahead).

You can also choose how much space will be reserved for saving data on the new drive, or turn data storage off (it will act just like the Ubuntu live CD).

That's it! Simply press Make Startup Disk and wait while the files are copied over.

Installing Ubuntu on USB Disk

On many modern PCs that are configured to allow USB boot, you should be able to just restart the machine with the USB drive plugged in and Ubuntu should boot straight from it!

It's a nice simple way to have a copy of Ubuntu in your pocket, wherever you go.

Installing Ubuntu 8.10 on a White MacBook

Ubuntu logo

Installing Ubuntu (or any other Linux) on a Macintosh is a slightly different process than installing Ubuntu on a more traditional PC. Various differences in the hardware, particularly the use of the EFI firmware system, mean that some extra effort is required to get your favourite distro up and running on your favourite hardware.

This tutorial is inspired and somewhat derived from the Ubuntu Mactel Community Documentation, as well as my own experience of this process.

So let’s take a look at the steps involved, before we dive in.

Overview

We can divide the installation process into these major steps:

  1. Make free space
  2. Install rEFIt boot loader
  3. Run Ubuntu installer (setting GRUB boot loader location)
  4. Sync MBR with rEFIt
  5. Boot the system and uninstall rEFIt

I will be installing Ubuntu 8.10 on a late 2006 white MacBook, so this guide may be somewhat specific to the white MacBook, but should be fairly similar on most Intel Macs.

Why?

Because the MacBook is a really nice piece of hardware. Many bits and pieces of the MacBook hardware work out of the box, including:

  • Graphics
    • Intel GMA 950 and Intel GMA X1300 integrated graphics have open source drivers, so everything ‘just works’ out of the box, including desktop effects.
    • The newer NVIDIA 9400M-based MacBooks will require the installation of the NVIDIA proprietary driver for full graphics support.
  • WiFi
    • Support for the WiFi chip used in the MacBook is built right into recent revisions of the Linux kernel. The result? WiFi ‘just works’. Seriously.
  • Bluetooth
  • Audio
    • After a little fiddle with the audio volume levels.

Backup, Backup, Backup

Before you do anything, make a full backup of your system. Anything you care about must be kept somewhere else as well, just in case this process goes wrong. A Time Machine backup should be fine, as long as you don’t forget to also backup the exceptions to your Time Machine backup separately if you don’t want to lose them.

Once you are completely confident that you could restore the entire system in a snap, or are convinced that you don’t care about anything on the machine, go ahead and continue with this tutorial.

Make Free Space

The first step is to make enough free space on your disk for Ubuntu to exist within. There are essentially two ways to achieve this. Unless you’re reinstalling Mac OS X from scratch anyway, it is probably a better idea to use the Boot Camp method, as you don’t have to delete everything to do so.

Using Boot Camp Assistant

Screenshot of Boot Camp Assistant

Despite being designed for dual booting Windows and Mac OS X, Boot Camp Assistant is very useful to us as it automatically repartitions the hard drive on the fly, without deleting any of your data.

The space that you allocate to ‘Windows’ in this screen will, obviously, be the space that Ubuntu will occupy, so give yourself as much space as you think you will need.

Once you’ve clicked Partition, simply choose Quit and Install Later, as we won’t actually be installing Windows.

Now Boot Camp Assistant very helpfully formatted the partition as FAT32. Um, great, but we actually want free space. We’ll fix this from the Ubuntu side later.

By Reinstalling

If you happen to be reinstalling OS X anyway, you can use Disk Utility from within the Mac OS X Installer (in the Utilities menu) to partition the disk, manually creating a Mac OS Extended partition for OS X and deliberately leaving some space as unformatted.

Install rEFIt Boot Loader

In order to fix the system’s Master Boot Record (MBR) after the Ubuntu install is complete, we need to briefly install rEFIt, a custom bootloader for EFI-based computers, including Intel Macs.

Go ahead and download the Mac disk image and run the installer package.

rEFIt Installer

Once it is complete, reboot the Mac and verify that you get a screen that looks something like the following (it won’t have a Tux icon yet and shouldn’t have a Windows icon either).

rEFIt boot screen

OK, we’re finally ready to kick off the Ubuntu install.

Run Ubuntu Installer

For the most part, this process is exactly the same as you would do on a PC. There are, however, two crucial steps you must get right.

Before getting started on the install, however, we need to get rid of the FAT32 formatting of the Boot Camp partition. Pop the Ubuntu CD into your computer and reboot. At the rEFIt boot menu, you can choose to boot Linux from CD. I recommend you plug in a USB mouse at this point so you can right-click.

Select Try Ubuntu without any change to your computer to get into the full Ubuntu interface. Once the system boots, go to Applications > Accessories > Terminal.

$ sudo gparted

This opens the partition editor, so we can go ahead and wipe that partition.

Partition editor screenshot

You’ll want to find the FAT32 partition labelled ‘Boot Camp’ (NOT the one labelled ‘EFI’ at the start), right-click it and choose Delete. Apply the changes.

Once the changes are applied, you can continue with the installation, as normal, except the following two things which must be set correctly:

Choose ‘Largest Continuous Free Space’

When you are asked by the installer how you want to partition the disk, choose Guided – use largest continuous free space. Since you just made sure you have a large chunk of free space earlier, by deleting the Boot Camp FAT32 partition, it will recognise that and use the space for Ubuntu.

If you are desperate to partition it yourself and know what you are doing, just make sure the bootable partition is the first one. Don't put your swap before your data on the disk, or the Mac will try to boot from the swap partition.

Install GRUB on sda

At the final page of the installer, ‘Ready to install’, where you are shown all the settings for the install, make sure you click the Advanced button and choose to install GRUB onto /dev/sda3.

Sync MBR with rEFIt

So, the installation should finish and you will be told to reboot. When the system comes back up, do not jump straight away into the new Linux option on your rEFIt boot menu.

rEFIt boot screen

Instead, select the Partition Tool icon. It should tell you that the Master Boot Record need to be synced and offer to do so. Press the Y key to accept this and you will return to the boot screen.

I recommend at this point you select the option to shut down your Mac, give it a few seconds to clear everything out and then turn it back on. This avoids a lockup I experienced right after you perform the MBR sync.

Boot the System and Uninstall rEFIt

At this point, you should be ready to go. At the rEFIt boot menu, choose the Linux option and Ubuntu should boot. At this point, everything should be just the same as it would be on a PC.

You can now uninstall rEFIt if you desire, or you can leave it intact and use it each time the system boots to choose your operating system. The choice is entirely up to you.

If you remove it, you can boot into Ubuntu with the Mac’s native boot loader by holding down the Option key at startup and choosing the disk entitled ‘Windows’.

Conclusion

And that’s it. After you’ve done this little bit of fiddling to get it installed, and perhaps once you have configured some components that don’t work out of the box, you have a very nice little Ubuntu machine.

Saturday, May 9, 2009

Speed up your system by avoiding the swap file

Most modern operating systems are capable of using a file or partition known as a swap or paging file. Most Linux distributions will also install one for you by default. This file is used to extend the amount of available RAM by writing some of it to your hard drive.

There's just one problem: hard drives are slow. We can't fix that problem yet, but we can avoid it. The Linux kernel provides a tweakable setting that controls how often the swap file is used, called swappiness. A swappiness setting of zero means that the disk will be avoided unless absolutely necessary (you run out of memory), while a swappiness setting of 100 means that programs will be swapped to disk almost instantly.

My Ubuntu system comes with a default of 60, meaning that the swap file will be used fairly often if the memory usage is around half of my RAM. You can check your own system's swappiness value by running:

cat /proc/sys/vm/swappiness

My HDD is insanely slow and I have 2 GB of RAM, so I'd like to turn that down to 10 or 15. The swap file will then only be used when my RAM usage is around 80 or 90 percent. To change the system swappiness value, open /etc/sysctl.conf as root. Then, change or add this line to the file:

vm.swappiness = 15

Reboot for the change to take effect. You can also change the value while your system is still running:

sysctl vm.swappiness=15

However, you won't get the full effect of rebooting because there is probably already memory stored in swap that won't instantly be moved out.

Update: Readers have noted that you can clear your swap by running swapoff -a and then swapon -a as root instead of rebooting to achieve the same effect.

Rescuing a Lost Root Password

Sometimes you wind up taking over a machine for which the root password has been lost. Here are a couple of solutions.

  • Reboot (hard reboot by pulling the power cable if rebooting requires the root password), and hit 'e' to edit the boot line when you get to the grub menu. Scroll down to the line that starts with kernel, then hit 'e' again to edit it, add 'single' to the end, and hit Enter to accept. Now 'b' to boot and eventually you'll be dumped into a root shell. From here type passwd to change the root password.
  • Some systems require the root password to boot into 'single' mode. In this case, try editing the grub boot line to add 'init=/bin/bash' to the end of the kernel line. This will boot you into a very basic system, using the bash shell instead of init. You may have to mount the root partition read/write:
    mount -no remount,rw /
  • Then use passwd to reset the password.

  • If grub is protected, try booting from a LiveCD or USB stick. Open a root shell, and use fdisk -l to show the available disk partitions. Mount the root partition with
    mount -o,rw /dev/hda1 /mnt
    Check it's the right directory with ls /mnt, then change into that as your root directory:
    chroot /mnt
    Now use passwd as before.
  • NOTE: It's important to bear in mind that all of these are also potential security risks if people have physical access to your machines.

    Saturday, May 2, 2009

    Remote Access to the Ubuntu Linux Desktop

    Ubuntu Linux provides remote desktop access. This provides two extremely useful features. Firstly it enables you or another person to view and interact with your desktop environment from another computer system either on the same network or over the internet. This is useful if you need to work on your computer when you are away from your desk while traveling or sitting in a coffee shop. It is also useful in situations where a co-worker or IT support technician needs access to your desktop to resolve a problem.

    Secondly, in addition to providing access to your primary desktop (the one you see when you switch on your monitor every morning) it also enables you to create multiple desktops and connect to them remotely.

    The Ubuntu remote desktop functionality is based on technology called Virtual Network Computing (VNC) and in this chapter we will cover the key aspects of configuring and using remote desktops with Ubuntu Linux. It is important to note that there are both secure and insecure ways to access a remote desktop. Although both approaches will be covered, the secure method is strongly recommended when accessing remote desktops over an internet or other insecure connection.

    Activating Remote Desktop Access

    The first step in setting up remote desktop access is to activate it and define some basic security settings. These settings are configured in the Remote Desktop Preferences dialog. To access this dialog, open the desktop System menu, select Preferences and click on Remote Desktop. When selected the following window will appear:


    Configuring Ubuntu Remote Desktop Access


    Configuring Ubuntu Remote Desktop Access


    The Remote Desktop Preferences dialog consists of two panels. The General settings panel is displayed by default and provides the following configuration options:

    • Allow others to view your desktop - Activates remote desktop access for viewing purposes.
    • Allow other users to control your desktop - Allows users accessing your remote desktop to control the desktop. In other words the remote user can do anything to your desktop that they want using their mouse and keyboard as if they were sitting physically at the local system. When this option is disabled, the remote user can see what is happening on the desktop, but is unable to interact with it using the keyboard and mouse.
    • Ask for confirmation - When selected, this option causes a dialog to appear warning you of an attempt by a remote user to connect and prompting you to confirm or deny the connection. If you are likely to want to log in remotely you will need to turn this off since you will not be at the local system to accept your own connection.
    • Require the user to enter this password - Specifies a password which must be entered by the remote user to access your desktop. It is strongly advised that you select this option and specify a password.

    Finally this screen specifies the command to run on the remote system to access the desktop.

    The Advanced configuration options are accessed by clicking on the Advanced tab. Once selected, the following panel will be displayed in the Remote Desktop Preferences dialog:


    Configuring the Ubuntu remote desktop advanced settings


    Details of the advanced configuration options are as follows:

    • Only allow local connections - Only allows remote desktop connections to be established from the local system. This essentially disables access from remote systems.
    • Use an alternate port - Remote Desktop access requires the use of a TCP/IP port. By default a port will be assigned to the current connection starting at port 5900. If an alternate port is required, select this option and specify the required port.
    • Disable the wallpaper when connected - A key objective of remote desktop access is to minimize the volume of network traffic involved in projecting the desktop to the remote user. If the desktop currently has a wallpaper image defined (in other words the background of the desktop) this will result in a considerable amount of additional network traffic. This option switches the desktop wallpaper to a plain background to reduce bandwidth usage thereby speeding the desktop presentation.
    • Require encryption - As previously mentioned, remote desktop access may be established using both secure and insecure mechanisms. When selected, this option enforces the use of secure, SSH based, connections when accessing the desktop remotely.
    • Lock screen on disconnect - Causes the desktop screen lock to be engaged automatically when the remote desktop connection is disconnected. This ensures that the next user to connect to the desktop will be required to enter a password to gain access.
    • Always display icon - Causes the remote desktop icon to appear in the Notification area of the top status bar when remote desktop access is enabled (even when a remote user is not connected).
    • Only display an icon when there someone is connected - Displays an icon on the Notification area of the top status bar when a user is remotely connected to the desktop.
    • Never display an icon - The Notification icon is never displayed regardless of the current state of the remote desktop system.

    Once you have configured Remote Desktop access you are ready to try connecting.

    Accessing a Remote Ubuntu Linux Desktop using Vinagre

    As mentioned previously there are both secure and insecure methods for accessing a remote desktop. In this section we assume that the desktop is being accessed by a remote system on the same local network where security is not a concern. See the section later in this chapter for establishing a secure connection if you are connecting from a system outside your firewall.

    Connection to the remote desktop may be performed by running either the vncviewer tool, or the newer vinagre on the system from which the remote desktop is to be accessed. On Ubuntu systems, vinagre is installed by default. On other systems, however, it may need to be manually installed. For example to install vinagre on a Fedora system, execute the following command in a terminal window:

    su
    yum install vinagre

    To access a remote desktop, open a terminal window and enter the command specified in the Remote Desktop Preferences dialog, for example:

    vinagre hostname:0

    where hostname is either the hostname or IP address of the remote system.

    If you configured the remote system to prompt to approve a connection a dialog will appear on the remote system. Until the connection is approved the vinagre session will wait. Once approved, or if no approval is required, vinagre will prompt for the password (assuming one was defined):


    Vinagre requesting a password to access a remote desktop


    Enter the password and vinagre will appear containing the desktop from the remote system. If remote desktop control was enabled you can interact with the desktop as if you were sitting at the remote screen. The following figure illustrates a vinagre session running on a Fedora system attached to a remote desktop running on Ubuntu. Note that only part of the remote desktop is displayed. The entire desktop may be viewed by clicking on the Full Screen toolbar button.


    Vinagre attached to a remote Ubuntu desktop

    Attaching to a Remote Desktop using vncviewer

    Vinagre is a relatively new tool and has a number of advantages over the older vncviewer tool (such as the ability to manage concurrent connections to multiple remote desktops). For those who prefer to use a simpler interface, or who use a system for which vinagre is not easily obtainable, vncviewer makes an adequate alternative.

    As with vinagre, vncviewer is not installed by default on many systems. To install vncviewer on Red Hat, CentOS and Fedora systems, execute the following commands in a terminal window:

    su
    yum install vnc

    Similarly, to install vncviewer on an Ubuntu system:

    sudo apt-get install xvnc4viewer

    Once installed, run the command using the following syntax where hostname is the host name or IP address of the remote system and port is the port number assigned for access to the desktop:

    vncviewer hostname:port

    If the remote desktop was configured to require a password, vncviewer will prompt for this before displaying the desktop:


    vncviewer seeking a password to access a remote desktop


    So far in this chapter we have assumed that the remote desktop was being accessed from a Linux or Unix system. Access is also possible from a Windows system.

    Accessing a Remote Ubuntu Linux Desktop from a Windows System

    In order to access a Linux remote desktop from a Windows system the first step is to install a Windows VNC client on the Windows system. There are a number of VNC packages available for Windows. In this chapter we will look at TightVNC (http://www.tightvnc.com).

    Download and install TightVNC on your Windows system. Once installed, launch the TightVNC Viewer and in the resulting Connection details dialog enter the IP address or hostname of the remote system and press OK. Enter the password if one is required. The screen should load and display the remote desktop,

    You may also enter the port number in the form hostname::5900 (screen 0 in VNC uses port 5900). TightVNC assumes port 5900 if none is specified but when we look at setting up additional desktops later in this chapter we will need to specify port numbers in order to connect.

    Establishing a Secure Remote Desktop Session

    The remote desktop configurations we have explored so far in this chapter are considered to be insecure because no encryption is used. This is acceptable when the remote connection does not extend outside of an internal network protected by a firewall perimeter. When a remote session is required over an internet connection a more secure option is needed. This is achieved by tunneling the remote desktop through a secure shell (SSH) connection.

    Before a secure connection is established the SSH server must be installed on the system to which the connection is to be established. For detailed steps on installing the SSH server on an Ubuntu Linux system see Configuring Ubuntu Linux Remote Access using SSH.

    Once the SSH server is installed and active it is time to move to the other system. At the other system, log in to the remote system using the following command, which will establish the secure tunnel between the two systems:

     ssh -L 5900:localhost:5900 hostname

    In the above example, hostname is either the host name or IP address of the remote system. Log in using your account and password. The secure connection is now established and it is time to launch vncviewer so that it uses the secure tunnel. Leaving the ssh session running in the other terminal window, launch another terminal and enter the following command to use vncviewer:

    vncviewer localhost::5900

    Alternatively, to use vinagre:

    vinagre localhost:5900

    The vncviewer session will prompt for a password if one is required, and then launch the corresponding viewer providing secure access to your desktop environment.

    If you are connecting to the remote desktop from outside the firewall keep in mind that the IP address for the ssh connection will be the external IP address provided by your ISP, not the LAN IP address of the remote system (since this IP address is not visible to those outside the firewall). You will also need to configure your firewall to forward port 22 (for the ssh connection) to the IP address of the system running the desktop. It is not necessary to forward port 5900. Steps to perform port forwarding differ between firewalls, so refer to the documentation for your firewall, router or wireless base station for details specific to your configuration.

    Establishing a Secure Remote Desktop Session from a Windows System

    A similar approach is taken to establishing a secure desktop session from a Windows system. Assuming that you have a VNC client installed (as described above) the one remaining requirement is a Windows ssh client. A popular ssh client for Windows is (PuTTY).

    Once PuTTY is downloaded and installed the first step is to set up a secure connection between the Windows system and the remote Linux system with appropriate tunneling configured. When launched, PuTTY displays the following screen:


    Image:putty_main_screen.jpg


    Enter the IP address or host name of the remote host (or the external IP address of the gateway if you are connecting from outside the firewall). The next step is to set up the tunnel. Click on the + next to SSH in the Category tree on the left hand side of the dialog and click on Tunnels. The screen should appear as follows:


    Image:putty_tunnels_screen.jpg


    Enter 5900 as the Source port and localhost:5900 as the Destination and click on Add. Finally return to the main screen by clicking on the Session category. Enter a name for the session in the Saved Sessions text field and press save. Click on Open to establish the connection. A terminal window will appear with the login prompt from the remote system. Enter your user login and password credentials.

    The SSH connection is now established. Launch the TightVNC viewer and enter localhost::5900 in the VNC Server text field and click on Connect. The viewer will establish the connection, prompt for the password and then display the desktop. You are now accessing the remote desktop of a Linux system on Windows via a secure tunnel.

    Creating Additional Desktops

    In the examples so far we have only covered remote access to the primary desktop. By primary desktop we mean the desktop you see when you sit at your computer and turn on the monitor. While this is fine for a single user system we should not lose sight of the fact that Linux is a multi-user operating system and it will often be necessary for more than one person to have remote desktop access at a time. While it might be fun to watch everyone fight over the mouse pointer as they share the same desktop it is clear that not much work will get done. The solution to this is to run multiple desktops for the users to connect to.

    New desktop environments are created using the vncserver utility. If vncserver is not already installed, it may be installed from a terminal window as follows:

    sudo apt-get install vnc4server

    Once the VNC server package is installed, the next step is to assign a password to protect the desktops. This can be achieved using the vncpasswd tool. Run this tool from the command-line prompt in a terminal window and enter the password of your choice.

    The desktop we have used so far in this chapter is desktop :0. New desktops must be assigned different numbers. For example to launch desktop :1 run the following command from a terminal window command-line prompt:

    vncserver :1

    This will start a new desktop in the background ready for a remote user to connect to. To connect to the desktop follow the steps for connecting to desktop :0 outlined above but this time use port 5901 instead of port 5900 (you will similarly use port 5902 for desktop :2 and so on).

    When the desktop appears you will notice that it doesn't look much like the standard desktop:


    Image:ubuntu_linux_remote_desktop.jpg


    The problem here is that we need to configure the VNC session to launch the correct desktop. To do this shutdown the VNC desktop session as follows:

    vncserver -kill :1

    Next go to your home folder and edit the $HOME/.vnc/xstartup file. This will look similar to the following file:

    #!/bin/sh

    # Uncomment the following two lines for normal desktop:
    # unset SESSION_MANAGER
    # exec /etc/X11/xinit/xinitrc

    [ -x /etc/vnc/xstartup ] && exec /etc/vnc/xstartup
    [ -r $HOME/.Xresources ] && xrdb $HOME/.Xresources
    xsetroot -solid grey
    vncconfig -iconic &
    xterm -geometry 80x24+10+10 -ls -title "$VNCDESKTOP Desktop" &
    twm &

    To configure this startup script to launch the standard desktop (known as the GNOME desktop) change the twm& line so that the file reads:

    #!/bin/sh

    # Uncomment the following two lines for normal desktop:
    # unset SESSION_MANAGER
    # exec /etc/X11/xinit/xinitrc

    #[ -x /etc/vnc/xstartup ] && exec /etc/vnc/xstartup
    #[ -r $HOME/.Xresources ] && xrdb $HOME/.Xresources
    #xsetroot -solid grey
    #vncconfig -iconic &
    #xterm -geometry 80x24+10+10 -ls -title "$VNCDESKTOP Desktop" &

    unset SESSION_MANAGER
    sh /etc/X11/xinit/xinitrc

    Restart the vncserver:

    vncserver :1

    Finally, reconnect from the remote system. The full desktop should now appear in the vncviewer or vinagre window.

    Run Windows and Linux without virtualization

    Linux does everything that many users want it to, but some people have tasks that require Windows applications. You can dual-boot both operating systems, or run Windows in a virtualized environment on Linux. Alas, virtualization makes the guest OS almost useless for processor- and RAM-intensive tasks like editing videos and playing games. Now, a Ubuntu-based distro called andLinux takes cooperation with Windows to a whole new level.

    The miracle ingredient in andLinux is its coLinux kernel. The coLinux project takes a stable release of the Linux kernel and ports it to run on Windows. That means that, unlike virtualization software, andLinux installs on Windows like any other application.

    But there's more to andLinux than just sticking the coLinux kernel in a stock Ubuntu. According to Joachim Gehweiler, one of the developers of andLinux, the project also had to roll in the Xming X server and PulseAudio sound server and make sure these components work together.

    andLinux is available in two flavours -- a 665MB version that uses KDE and takes up 4.5GB of disk space, and a lightweight 143MB version with Xfce that uses 2.5GB on a hard drive. The developers recommend earmarking at least 192MB of RAM during installation for andLinux, but make sure you have enough memory left for Windows itself. andLinux will run only on 32-bit versions of Windows 2000, XP, 2003, and Vista, and your hard drive needs to be formatted using the NTFS filesystem.

    Click to enlarge Both versions of andLinux are distributed as Windows executable files, and launch the easy-to-use andLinux graphical installer. The installer asks questions to help it bridge the gap between Windows and Linux. For example, to access your Windows files from andLinux you have the option to either use Samba or COFS (coLinux File System). While COFS is easy to configure, the andLinux installer advises you to use Samba if you have filenames with special characters. To further enhance the co-existing experience, andLinux lets users configure file type associations, and decide which Linux applications to add to the Windows "Open With" menu.

    The installer performs several behind-the-scenes configuration tasks, such as setting up the TAP-coLinux network adapter for sharing the network connection with Windows. Most of these tasks are performed by the Inno setup scripts on the Windows side, but some, such as Samba setup, have to be done from the Linux side, and are performed by bash and Perl scripts written by the andLinux developers.

    The installer also creates an andLinux start menu entry and quick launch icon. andLinux installs as a Windows service and can start automatically when the computer boots, though depending on your hardware this could slow down your Windows boot process. You can also launch andLinux manually at a command prompt, but there's no shortcut on the desktop or a quick launch icon you can click to start andLinux.

    I run andLinux on two dual-core boxes -- an E4400 2.0GHz machine with 2GB of RAM, and an E6300 1.8GHz with 1GB of RAM. On both machines starting andLinux as a service doesn't cause any visible stress, just disk activity after Windows boots, indicating andLinux starting up in the background. On a slower 1.7GHz Celeron laptop with 1GB RAM, I see a steep increase in application launch times while andLinux boots in the background, but things get back to normal once andLinux's up and running. That's an improvement on the laptop's performance when running a virtual machine, during which time it crawls to a halt.

    The loaded Intel dual-core boxes are optimized to run virtualized software thanks to Intel Virtualization Technology, but andLinux doesn't have any hardware-specific optimizations. The developers say you will benefit from virtualization threads only when running one Linux application concurrently with at least one Windows application. But this advantage is negated when you run two (or more) Linux applications, as all such apps are treated as one Windows process.

    andLinux creates a 4GB virtual partition out of a portion of the partition it's installed in in which it keeps its binaries, and shares a small part of the Windows file system via Samba or COFS depending on the method you chose during setup. You can keep files you create using andLinux applications on either the virtual partition or the Windows file system.

    At first, you may feel andLinux is a bloated way of running Linux apps that have Windows versions as well, such as AbiWord, the GIMP, and Firefox. Since they run atop the Windows desktop, you don't see the Xfce or the KDE desktops. But as you continue exploring you'll notice Konqueror and its KIO slaves and a bunch of KDE utilities and games that have never run on a Windows desktop before.

    When it comes to remote sharing, you can configure andLinux to let you SSH into it from another machine. You can also remote share your Windows desktop via VNC or rdesktop and implicitly remote share andLinux.

    To further drive home the point that you are really running a Linux distro, there's the command-line apt-get and the graphical Synaptic utilities configured for installing additional applications from Ubuntu's repositories. I tried some applications from the repository (including OpenOffice.org, Pidgin, AbiWord, XChat, and Thunderbird) and they all worked. You can also install new apps by compiling them from source.

    But you are not only running a Linux distro in Windows; you're running one alongside the other. To experience the cooperative nature of andLinux and Windows, you can right-click on a .txt document and open and edit it in Kate, read a .pdf in KPDF, and copy and paste text between a Windows app and a Linux one.

    What you won't be able to do is play 3-D games, such as Alien Arena or Torcs. Nor will you be able to use your TV tuner card to watch videos on Linux with MythTV, or use your Bluetooth devices, even though some TV tuners and many USB bluetooth dongles work on all major natively-installed Linux distros.

    On the plus side, you can share your printer between Windows and andLinux, thanks to recently acquired printing support. Printing support is expected to be included in the next release so you'll be saved the effort of setting it up manually.

    Running atop Windows has one final disadvantage. andLinux lacks security support for multi-user environments and can be run by all Windows users that have access to the computer.

    For a desktop user, andLinux is a productive method of running Linux and Windows together. It doesn't focus on segregating Windows and Linux as host and guest OS. Instead of merely coexisting it allows the two OSes to cooperate, resulting in the welcome ability to share files between the two OSes and open files using apps on either OS. It's still slower than a pure Linux installation, but it runs smoothly as compared to Linux running on an emulated PC, especially on older and slower hardware.

    All said and done, andLinux's limitations aren't any greater than those of a virtualized environment, and in its current form, neither are its advantages. But I'd still recommend it to desktop users, due to its non-existent learning curve and for taking Linux-Windows interoperability to a whole new level.

    Thursday, December 27, 2007

    Howto install Firefox 3 Beta 2 in Ubuntu 7.10

    Firefox 3 Beta 2 is a developer preview release of Mozilla’s next generation Firefox browser and is being made available for testing purposes only.

    These beta releases are targeted to Web developers and our testing community to gain feedback before advancing to the next stage in the release process. The final version of Firefox 3 will be released when we qualify the product as fully ready for our users.

    Firefox 3 Features

    Firefox 3 is based on the new Gecko 1.9 Web rendering platform, which has been under development for the past 28 months and includes nearly 2 million lines of code changes, fixing more than 11,000 issues. Gecko 1.9 includes some major re-architecting for performance, stability, correctness, and code simplification and sustainability. Firefox 3 has been built on top of this new platform resulting in a more secure, easier to use, more personal product with a lot under the hood to offer website and Firefox add-on developers.

    More Features check here

    Installing Firefox3.0 beta2 in ubuntu

    Preparing your system

    sudo apt-get install libstdc++5

    Now you need to take backup of your old firefox prferences

    sudo cp -R ~/.mozilla ~/.mozillabackup

    Now you need to download firefox 3.0b2 from here

    Now you have firefox-3.0b2.tar.bz2 file

    Unzip the .tar.bz2 file in /opt directory using the following command

    sudo tar -C /opt -jxvf firefox-3.0b2.tar.bz2

    Now you need to link the plugins using the following command

    cd /opt/firefox/plugins/

    sudo ln -s /usr/lib/mozilla-firefox/plugins/* .

    Now you need to create a link to your new firefox launcher using the following command

    sudo dpkg-divert --divert /usr/bin/firefox.ubuntu --rename /usr/bin/firefox

    sudo ln -s /opt/firefox/firefox /usr/bin/firefox

    sudo dpkg-divert --divert /usr/bin/mozilla-firefox.ubuntu --rename /usr/bin/mozilla-firefox

    sudo ln -s /opt/firefox/firefox /usr/bin/mozilla-firefox

    Installation of firefox 3.0b2 is completed.